**We're keeping this ONE**
I found these two pieces 2 years ago and finally got around to painting them.
They are going into My Oldest Son's "NEW" room. With these two pieces finished~~I'm one step closer to finishing the room makeover. YAY!
.
.
.
Here are the BEFORE PICS:
I am loving the warm weather in UTAH! So, is my husband
(cuz i'm painting stuff, which means more crap out of the garage)
Truthfully, I was starting to go c-r-a-z-y inside.
Plus, when it's warm, I get way more painted outside than in my paint booth.
HaPpy DaY all the way around FoR EvERyoNe!
.
.
AFTER a little putty and removing the hardware.....Then some sanding:

NOW, for PAINT...
The color scheme for his room: dark teal/blue color and greys. A hint of black.
The rest of the room makeover is a secret SO....."Follow Me" for the REVEAL!!!
After the first few coats, I found areas of the cabinet that were buggin me.
So, I had to add some more putty here-n-there, and even sanded a little more.
and then.......
STOP~~~I NEED CAULK!

I also had some larger than normal gaps showing in the doors.
So, I added caulk in those spots.
Here's the caulk I used:
Caulk is quite universal, so really U can use whatever U have.
Just make sure that it is paintable.
NOTICE: One side is caulked and the other isn't. This will polish off the restoration of the piece after I REPAINT it.
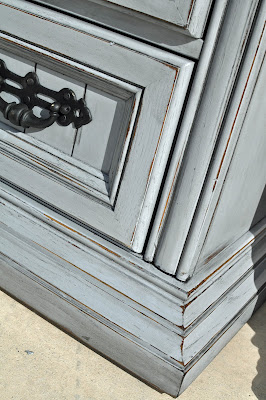
 NOW for some distressing. I used an orbital sander and sheets of sandpaper (120 grit--sometimes I use higher if the paint is thinner~~it always depends on the project and the desired effect). I just rubbed on the high parts of the piece. After I glaze the furniture, this effect will be AMAZING!
I like to go down to the original finish on some of the edges. On others, I go down below to raw wood. I {heart} the dimension this adds to the piece. WARNING: don't go soooo deep that the leveling gets all messed up. Also, you can take a flat edge and chip here-n-there.
 Did you notice the hinges have paint on them? I rubbed vasoline onto the hinges before painting. Thus, after I am done glazing the furniture, I will wipe of the hinges and they will have just a bit of paint in their cracks. I WANT THEM TO LOOK THIS WAY!!! It is part of my distressed "LoOk". If you ever paint a hinge on accident and you want an easy way to get the paint off, remove them from the furniture, put them into an old pan with water over them, boil for 20-30 minutes, and the paint floats/rubs off. Good to know, right?
**
**
**SOMETIMES i DO AND SOMETIMES i DON'T**
**USE THE HARDWARE**
*
i JUST SPRAY THEM WITH THIS PAINT,
SOMETIMES ALL THEY NEED IS A FRESH COAT.
Then, I lightly distress a few edges with a sanding block.
**
**
AFTER:
I glazed with black, added a clear poly coat and then the hardware. What do U think? {L}oving it?

~~~It's GROOVY~~~
I {heart} how the black glaze filled all of the groves in the pieces.
NOTE: these will be in a {NEW} bedroom reveal coming soon. SUBSCRIBE to my blog, so U won't miss out.
Go create something, I am.


5 comments:
love the color! they look so pretty and beachy!
I really love the look of this! can't wait to see the big reveal.
Thanks girls, I've been working hard. A hint: it includes globes of the world. Also, when I brought home the new light fixture, my husband said:"Oh, you went Nate B. on this."
This looks fantastic. Your son will love them.
Awesome makeover you have here!! Would love to have you come by and enter my “coastal” giveaway…you can find it on my sidebar.
Blessings,
Linda
Post a Comment