Monday, October 10, 2011

{H}alloween Costume Idea


This year I had one of my Boys say: 
"I want to be a Scarecrow."

How do you make a Scarecrow?


Here is what I did.  
It wasn't hard, and took about two hours to complete.  He wanted it to look like something we would have on {O}ur porch.  So, if it were on {My} porch-it wouldn't be scary~but cute.  His plan was to blend into the decorations and then scare unsuspecting TRicK-oR-TreATers.  

The problem, he is a young teen and it had to be somewhat scary OR he would be heckled by the other boys. Right?  

So...........
I went to my craft supplies.  I knew I had stuff from the year before when I made Scarecrows to sell {Maybe, I'll do it again Next Year}.  Anyway, I had everything but pants.  So we found those at the D.I. {A loCAl ThrIFt STorE}.

Then............GOT out my favorite weapon~
~THE HOT GLUE GUN!!

NExt: I added Raffia on all of the cuffs w/the glue gun.  I just added gobs here or there.  It didn't have to be perfect because he was a scarecrow.  Also, glue some raffia hair to the hat and add a dab in the pocket {for cuteness}.  

I knew after a few parties, it would fall off here and there anyway.  Plus, sometimes, I found myself crushing the raffia to add were I missed a spot.  
EASY REMEMBER!


Then I did the patches.  I DID NOT SEW these on.....I glued them too.  After they cooled, I added the stitch detail with a sharpie marker.  AGAIN, Easy & Fast.  

Just add at the elbows, knees, and front pocket.   


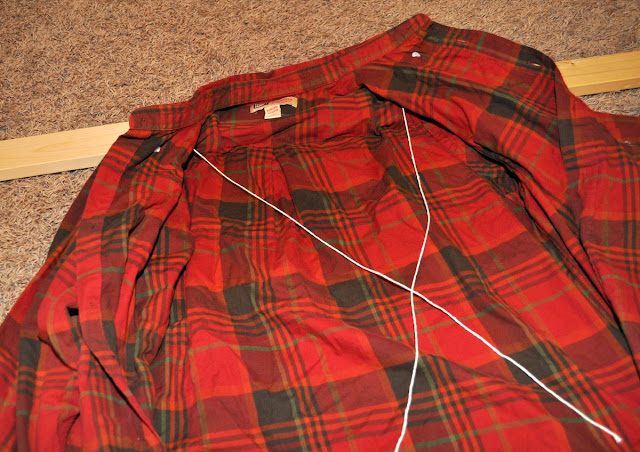
Now, for the board across his back.  I found one in the garage, it was a 1"x4"x36" pine.  Cut a slit in the back of the shirt were there is two layers of fabric.  It worked well to hold the board in place.  Before pushing it through, I drilled two holes at his shoulders.  Threaded a small string through to tie to his britches.  Then pushed it in and threaded the string into another hole I cut that would lead to his belt loops.  
Check out  the pictures to understand better.  

{It's kind-of a redneck approach BUT who cares-You aren't wearing the wedgie, RIGHT?}


These are his REDNECK suspenders ~~HA HA 
or WEDGIE!!! YIKS

While the glue gun was still hot, I added the crow.  I had to drill the board were he sat-so I could thread the wire on his feet through it.  If you don't do this, the crow will fall of at the edge of your drive way the minute they head out for candy.


ANyWAy, I glued some moss stuff at the bottom to cover the mechanics up.  My son, asked what that moss was for and I said, "Scarecrows stay put in a field....You don't think birds build nests on them?  Did you want poop down your back too?"  We laughed.  I love him.

Lastly, a scary mask {Ya, one less face to paint this season}.  This was from an old costume from a few years ago.  Worked good and it made it appropriate for a teen.  I tied an old rope from scouts around his waist and add the bandanna around his neck.  He will have boots on that night.
Completed the look with gloves to grab you with.  REMEMBER, his arms aren't connected to the board.  He has to hold them up to really look the part.

If you were doing this for a girl, I would find a pink flannel and paint her face cute. 

I promise this was easy!!!


HAPPY HALLOWEEN

Here are the kids heading out for the night.  
I love that my Daughter is a cute kitten with monster arms in the air.
RAAAwww.....

Wednesday, October 5, 2011

{This} is Halloween


Halloween at our Home
First, this is my favorite song at Halloween.
Have a listen.
{This Is Halloween from the Nightmare Before Christmas


Now that you're in the spirit....I wanted to show you a peak of our {H}oliday HALLOWEEN decorating.

This is HaLloWEen {My} style......not the scary kind with the blood and guts.  This "kind" is whimsical {Not} scary for the sake of little people/girls {ie: Hailey-if she doesn't like it, it goes back in the box tell next year}.


Owe, by-the-way, HALLOWEEN at our house seems really PURPLE this year.

Anywho, it started when my best-ie had a PURPLE couch she had painted for a Halloween party.


{ta-da  da-da} 
This little beauty was free and took 5 cans of Krylon-5.  So, that's really-like $25-$30 in paint for the cost.  BUT she doesn't look at stuff like that.  Anyway, lucky for me.  I bet her finger was falling off!
AFTER the party, I inherited it.  How often do you get to use a PURPLE couch and then get rid of it afterwards-NO storing for me! {I think my husband was scared we were it's new owner, though}  Hello people, she even delivered it.  
I love her gutts.


Sooooo.....this is what I did. {Finished it at 12 0'clock a.m.}


& then we took some pumpkins and did this......

My friend, with the purple couch, also delivered 48 pumpkins to us for the cause.  They are the ones Walmart don't want {no stem/flat spot/green side/NOT right}.

{Our} sPoOkyness gets even better at night~~~Hee Hee Hee

                                   So, what do you think?

Tuesday, September 20, 2011

{H}ot PiNk DreSSeR


~SOLD~
FOR SALE $130

HOT PINK 
{Zebra}Strips Dresser

I LOVE this Dresser.  It's Shabby Chic.
If I were a younger, I would be pouting until my {M}om bought this for me!!!  
{I'm not even kind'in}  
When my little girl gets bigger, I'm painting another one for her.


Demensions: 23"W X 18"D X 41"H


The scalloped edges a just darling and add to the details.

A FEW VIEWS~~

      The Story: This dresser was given to my brother by my mother forever ago.  He painted it BLACK {not in a good way either}.  After a while, it came back to my Mother.  She then gave it to me.  I painted it Forest Green {remember that trend} and added new hardware.  Then, I gave it to my Grandmother who had it until she passed away {missing her}.  I inherited it again, and then did this.

This is some of the {P}rocess:


The knobs haven't had the corners knocked off yet.  
I love the look of the brass showing through the knob backs.

Hope you {Love} it Too!!

Thursday, September 15, 2011

Pinterest

If you've been living under a rock, you don't know about this fab new tool. 


I love {Pinterest}!  


How did I not invent this myself-snap.  Look in my sidebar and follow me.  I'll accept your membership and everything.  PLUS, I get to look into your {Pins} too.  Owwww, I can't wait.  Love your gutts.

Thursday, September 1, 2011

{O}ne of my Favorite Places


{Tammi's} Finder's Keeper's 
American Fork, UTAH 
Love this store~  
She did a segment on a local TV Station and I wanted to share it with {YOU}.
Love the advice she offers~


If you want to view it from Studio 5, use this link~
Studio 5-How to Add Storybook Charm to Your Child's Room


When I was decorating Hailey's nursery, I had a hard time finding the perfect pieces.  I wasn't in the mood to refurbish anything. (Truthfully, after I was back to myself, I wished I would have refurbish pieces myself instead of buying new.  It adds so much more character to a room). I was seven months prego when I decided to get started.  It was ice cold outside with snow falling everyday.  

Anyway, after my Hubby and I spend a day out-and-about looking for furniture, I came home empty handed.  A friend's sister told me about this store.  It is about an hour South of me, and I headed out.  I fell in love with everything.  Hailey's tiny chandelier came for there.  It is worth a visit~trust me!  

Check out her website
http://tfkhome.com/
Other Info......
63 East Main St., American Fork, Utah 801-492-7730
They aren't always open, so check the Store Hours before you
head out.  


It is soooooooo WORTH the drive!!!


One more segment she did in the fall.  
Great inspiration and GREAT {How to} Information~


If you want to watch the segment from the Studio 5 link~
Studio 5-Refinishing Furniture 

There you have it, take my advice....
..............check it out.

Friday, August 12, 2011

Updated Projects


Click over to my {Upcoming Projects} bar and get a sneak peak of what I working on.

Remeber: If you want it, want to pick the color, etc.--Contact me.  Find all my stuff in my menu bar.

Note: The early bird gets the egg...{Translation: FINDERS KEEPERS, LOSERS WEEPERS.  If you see it first, you get first dibs, right?

Wednesday, April 27, 2011

{Little Red End Table}

 
{SOLD}
For SALE $125


This red has always been {My} favorite color.


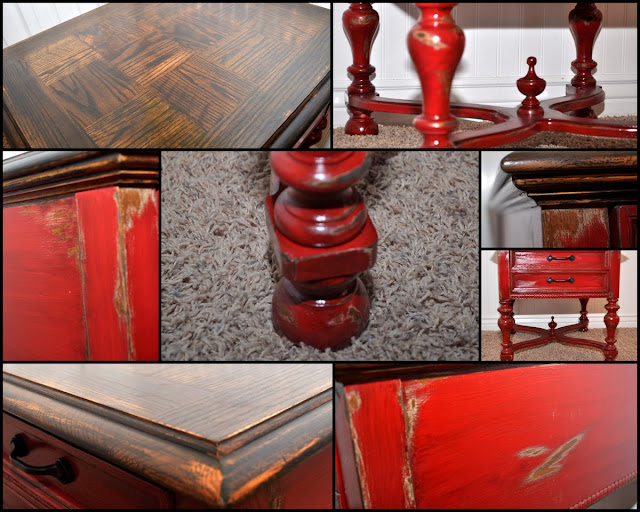
This small end table that has been refinished in a "Barn" Red color.  It has a vintage feel to it.  I love the legs and the little part underneath it that pokes up.


It has a grain-checkered pattern on the top of it.  Braided front.  All of the legs were sanded to bring out the details.
The top edges have been knocked off to add some dimension to the piece as well.  


After sanding it down, I used a primer and then a very dark glaze.  I wanted the "yellow wood" color in the original finish to poke threw here-and-there.  SO I wiped it down heavier on those edges.  I {Love} the added effect.


It has two drawers that are versatile and they have new hardware added.  The top has a protective coat.


This red is ideal-it goes with every home decor.  Darling details and a heavy/sturdy table.  
Demensions: 23W X 27D X 24H
LoVE It!!!


BEFORE:

DURING:
too bright, Right?
Awe....Glazing makes ALL the difference.

So So Cute!
Related Posts Plugin for WordPress, Blogger...